This Fall we are all about Rope (a.k.a. Corde Lisse) here at AerialDancing.com. We’ve been uploading new Aerial Rope videos to our site. These videos are available to our full access members, but today, you get a taste of what they get to enjoy every day. Below we have a video covering the 3 variations of the basic climb. The basic climb is so basic that it gets easily overlooked in its complexity. You may not think twice about teaching it. You might think it’s a 10 minute affair to teach- but no! There are levels of complexity and an effective teacher will plan out the steps towards the basic climb weeks before arriving, and then build on technique and variations to challenge the student’s body awareness as they climb. If you want to set your students up for success in the basic climb, keep reading. If you love the depth of this article, you will love when the Rope Manual Volume 1 gets released 2015!
Before we jump in to teaching techniques -> note that this information applies to teaching both rope and fabric. The video below demonstrates the basic climb variations on rope, but you could just as easily be on fabric.Progression #1: The Basic Stand with Bent Arms
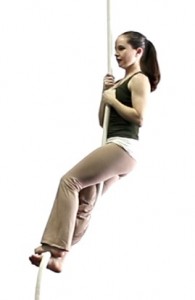
When they first learn the basic wrap, I have students hold with bent arms as they wrap the basic wrap on their feet and stand. This position is known as the basic stand. I judge their level of accomplishment by whether or not they can open their hands (blocking on the rope so as not to fall backwards). If they can relax their grip, then they are adequately squeezing with their feet and this is what is required in a solid basic stand.
Progression #2: The Basic Stand with Straight Arms
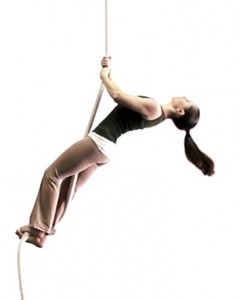
Teach students to hold the rope with straight arms as they perform the basic wrap from the ground. Once they have the basic wrap on their feet, they have two options to stand; they can either (1) pull straight up to stand with arms bent or (2) perform a roll through the spine to stand on their wrap with bent arms. It’s common for newbies to skimp on the roll through. Push with the hips, then roll all the way up until the head rolls back. It is the last thing to come up. Newbies can act like their head is going to fall off, and not want to tilt it back. Let it release and then pull it back up so the motion flows. It doesn’t have to be big and juicy, but make it work. An effective roll up uses very little arm muscle. It’s all about initiating the movement with the hip push. Once the hips are over the legs, it just becomes a matter of stacking the rest of the body at the new level in space.
Progression #3: Perform 2 Basic Stands in a Row
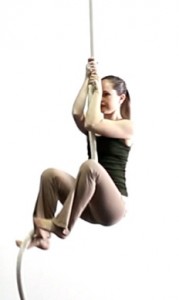
Once a student is successful in the straight arm from the ground to basic stand, they are ready to climb, but don’t tell them that! It can be a powerful tool to simply instruct students to perform a second basic stand while they are in a basic stand. This is especially powerful for students with the preconceived notion that they will be bad at climbing. If you say, “Let’s climb,” they might set up a mental road block. But, if you simply say, “Let’s add another basic stand,” they are simply repeating a step that they have already conquered. This proves to overcome the mental road block with a high success rate! (Special thanks to Amy Tynan for highlighting the importance of this teaching tool.)
Now, students will be gaining height, so be sure to prep them for the exit prior to having them climb. Clearly demonstrate either the hand under hand slide descent or the inch worm decent.
Progression #4: Roll Up Climb
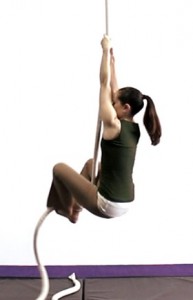
Do you realize that there are at least 3 variations of the basic climb? It can be effective to include all three as you teach this climb. You might not teach all 3 in one day. It depends where the students are at in their level of ability and how fast they soak up information. Sometimes it’s good to approach the basic climb only one way when first learning, then add variations later when the students are ready to hone their technique. The variation I like to start with is the Roll Up. The roll up can be slightly more complicated then the basic straight arm climb, but it is the easiest in terms of strength if students know how to utilize their roll up efficiently. That was the reason it was important to lay the right foundation back at step 2 of the progressions.
Progression #5: Emphasis Retrogrades
When I first teach a climb technique, I have students use their favorite descent (whatever they worked on in progressions 3). But, once they have the hang of the climb, I emphasis the one thing I emphasis whenever and wherever I can: the RETROGRADE. Retrogrades are one of your biggest teaching tools. They allow you to give students a chance to puzzle things out and really think about steps. Generally, I try to avoid showing retrogrades. I like to ask students to figure it out. Say, “Now, try to come down the fabric reversing how you went up.” Students have to use their critical thinking skills to analyze exactly how they go up so that they can reverse it. One of my favorite parts to teaching the roll up climb is the retrograde descent. Check out the video below to see the retrograde in action.
Progression #6: Basic Straight Arm Climb
In terms of strength, this climb comes next. Here’s the cuing that I prefer on this one: “Keep your nose close to the rope. As you rise, use your hands to pull your body close to the rope, and use your leg power to stand.” Too many students neglect using leg power in this climb and can fall off alignment as they stand. Watch for the whole spine standing straight and tall and moving upwards as one unit. The retrograde of this climb is the inch worm. If students are having trouble with the roll up when you teach it back in progression 2, teach this variation before progression 5. These two climbs are so similar, the order doesn’t really matter. In fact, for the manly men, I skip the roll up altogether.
Progression #7: Add a Pull Up
With monkey boys in your class, they may naturally perform this variation without your prompting simply because they love using the power of their upper body strength. For them, progression ordering may look a little different because you’ll have to teach them how to harvest the power of their legs, and reserve the energy in their arms that will be important for stamina in performances later on down the road. To perform this variation, start with straight arms and basic wrap just like normal. Only this time, after standing, reach those arms up and pull up. As you pull up, perform the wrap and stand on the wrap. In this variation the legs might not work very hard at all because the emphasis transfers to the arms. Again, reach up and pull up prior to wrapping. In the retrograde of this climb, slide the legs while the arms reverse pull up to lower down.
Summary
The reason that I save the pull up variation for last – even though for some it may be the most intuitive climb – is because I want to teach students how to use their whole body and how to use it efficiently. This way, when they are performing a 10 minute aerial piece and they have to climb the rope for the 5th time, they understand how to use their body so that they don’t always have to use their arm strength. They learn how to effective use their leg power or the power of the hip push to make their height gains.
Other Teaching Notes
It should go without saying that proper shoulder engagement should be used throughout teaching all climbs. I’m not a big fan of the cue “Pull your shoulders back.” It encourages too much arching and can pull the rib cage forward too much as the student tries their best to obey the cue. My preferred cuing is “Relax the shoulders down into neutral.” This allows students to release tension in their neck, where they don’t want or need it. It sends the message that the shoulders should be down, but not excessively. The check for proper alignment is to see if the student’s shoulders look the same on the ground and in the air. Nothing should be changing from walking around to performing pull ups in terms of how the back, rib cage, and shoulders all align with one another. All the muscles should be working to maintain the alignment that they approach the rope with. No significant changes should occur in the upper body. This doesn’t mean things aren’t working below the surface, but the goal is to keep the appearance of relaxed and neutral.
One last note that should also go without saying – but let’s be thorough: Have students (and yourself!) practice the basic climb on both sides of the body. This includes both the feet switching and which hand is on top. You can take an entire climb up with rope on the same side and repeat on the second side or alternate as you go. Variety not only helps the body, it helps build body awareness as well. Be disciplined to always include both sides in your training.
Hopefully, this article has brought something new for you to think about. Keep in mind this method of approach is not THE way. It is A way. Incorporate the teaching techniques that work for you, adapt others to fit your style, and throw the rest out. It’s important that teaching fits the personality of the teacher and the level of the students. Your students might be completely different from my students and might require different methods of approach. I am constantly changing the way I approach teaching new moves, and you can too!
Happy Flying!


