Recycling Tire Tubes for Resistance Bands

Three women perform shoulder stretches with tire tubes during a workout with Molly Graves at the Marsh Studio

Molly holds a tire tube in her hands

When Molly Graves brought out her recycled tire tubes during my first retreat to the Marsh Studio, I knew she was a genius. Not only is this a super-awesome exercise tool, but tire tubes are recycled and free. Good for the environment, good for you! And the tire tubes make a great gift!

You can go up to any bike shop, and they’ll be happy to give you their used tubes. These are the inner tubes that go inside the outer tube, so this part doesn’t touch the road. Just ask for one that hasn’t been repaired with slime (a goo that’s used to fix flats), cut off the valve, use a nail file to shave down the ridge and you’ve got your new favorite stretch tool.

Tubes come in different sizes. Molly recommends experimentation, but be careful not to overstretch yourself or your tire tube– the rubber can snap. And just like they say at the beginning of fitness videos, be sure to consult with your doctor before you begin any exercise program.

Stretching with bicycle tire inner tubes

Molly demonstrates shoulder exercises with tire tubes

“Anything you can do with a theraband, you can do with this,” Molly says. “There’s a little more resistance.”

Shoulder and side stretches

Shoulder stretch

  • Put your hands wide on the doubled tire tube.
  • Keep shoulders engaged in sockets– you may need to spread your hands wider across the tube.
  • Notice if one side is stiffer than the other.
  • Molly says this a great exercise to do everyday

Full circle shoulder stretch

  • Continuing with the first shoulder stretch above, make a full circle around the back, then to the front
  • Notice how you breathe
  • Switch directions

Sweeps

Molly sweeps the floor in this tire tube shoulder stretch

  • Keep your hands on the folded tire tube as described above, but fold yourself to the floor
  • Begin to “sweep” the floor with the tube, right, then left, then right, and so on.
  • Begin to sweep higher– higher right, higher left, etc. You will begin to rise.
  • Then begin to sweep around and behind
  • Try the opposite side as well
  • Have a little dance with the tire tube

Leg stretches

Molly shows how she wraps the tire tube around her foot

Hamstrings, calves and hip flexors

“It’s like being able to give yourself an extended arm,” Molly says.

  • There are many ways to use the tire tube for leg stretches:
    • You could double-up the band and put it on top of your foot
    • You could just put one loop over your foot.
    • Molly’s wrap includes the foot and ankle (see photo).
  • Wrap the tire tube around your foot and ankle.
  • Holding the tail of the tube, pull your leg back for a hamstring stretch.
  • Next, pull it over and across your body.
  • Then let it go down and out to the other side, making a semi circle.
  • Switch sides.

With the tire tube wrapped around her foot, Molly pulls her leg back

Straddle splits

Molly wraps an end of the tire tube around each footMolly carefully extends her tiretubed legs into a straddle

Molly lies on her back to allow gravity to pull her legs down for a wider straddle

Note: The resistance in your tire tube will vary. To avoid snapping, start with a longer tire tube.

  • To get into this:
    • Sit with your feet together.
    • Wrap the doubled tire tube across your low back.
    • Put loop over one foot
    • Now stretch the tube across your low back so that the other loop end can go over the other foot. There will be some resistance.
    • Slowly extend one leg, then the other, until you are in a straddle split.
      • You may need to adjust the tube across your low back. You should feel pretty relaxed.
      • Now watch some TV.
  • To come out, slowly bring in one foot, then the other, and carefully remove the tube.

Conditioning: another awesome use of tire tubes

The tubes aren’t just for stretching; they make a great conditioning tool as well. Molly says you can fill up the tire tubes with sand, knot them up, then wrap them around your waist or ankles during your rope/fabric climbs. More weight=more strength! You go girl/boy!

Molly holds a tire tube of sand used for conditioning purposes

Lauren Blais contributed this article which was originally published at Aerial Journal (www.aerialjournal.com). I(Rebekah) thought this was simply brilliant when I read it. I went to a local bike shop, and sure enough, they had a few tubes to spare. Now, one them snapped on me within an hour of use, so definitely be careful. Next time I won’t cut off quite so much of the air insert.


Two Silks on One Rescue 8?

Is it safe to rig two separate silks on one rescue 8 accommodate a higher rig that your fabrics aren’t long enough for?

~L.K, aerial dancer


marissa on two fabrics

DISCLAIMER: I AM NOT A RIGGER. The words below are my personal opinion based on my experience, and basic understanding of rigging. It is always best to consult guidance from a qualified rigger when rigging any aerial equipment. 

In short, yes. You are not changing the load on the rescue 8 when you do this, and that’s important to know when analyzing the safety of the rigging. What makes it safe/unsafe is how you tie the knot. If your knots are loose, and it unravels, well, then obviously that makes for a very dangerous situation. There is certainly less risk in using one piece of fabric because there is smaller room for human error in the knots at the top (not to say there is no risk, but just smaller).

I use this technique all the time. My favorite reason is to have two silks of different colors. (The picture above comes to us from one of my students, Ma

risa Luboff.) I have also put two fabrics on one when I cut fabric that was really long only to find out I needed the length when I was teaching at a circus camp.

I like playing it safe so I usually use up a lot of fabric in tying my knots, and in my knots after the main knots, and back-up knots on the back-up knots. I tend to try to keep the top of fabrics out of pictures because they can look like beehives sometimes when I do this. Not pretty, but safe, and that’s what I go for. Others have found ways to do things both pretty and safe, and that’s why I have pulled from other resources (see below).

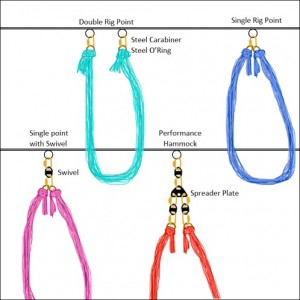
Keep in mind you don’t have to use one rescue 8 to accomplish your goal. You can do what the aerial yogis do and use a carabineer or ring for each fabric and wa-la! You can add a spacer for added distance between the fabric. I have included pictures below from Aerial Essentials (www.AerialEssentials.com) as well as a rigging video on how to tie a single fabric to a ring. There are many ways to do this, but they show a way that works just as well as any other. (Just pretend that the sling is cut into two pieces and the bottom, and you’ll have what you are looking for.)


riggin2

Trimming Fabric


Hi Rebekah,

I’m thinking about trimming my silks (they are 108 inches

wide, which I’m realizing is just a hassle to grip). I think my instructor

said she trims hers to 80 inches or so – but my googling turns up

people saying you shouldn’t trim them because it weakens them (one

person thought the edge was sort of particularly strong, although

looking at mine, it doesn’t look that way). Do you trim/not trim? And

if so, to what width?

Thanks!


What a coincidence to get your e-mail today. I just did my first trimming job today! I took about a foot off my 110 inch purple fabric that I thought was way too much to work with. The company that sells the fabric that I by from offers their services to cut the fabric thinner for you before you get it. If they can cut it down and it is safe to do so, then I’m sure there’s no difference in cutting it yourself. (But this is going to depend on where you get your fabric.)


I can see why people would say that cutting the fabric weakens the fabric. With less fabric around to grip, you are putting more force per square inch, and putting more force per square inch will cause the breaking strength to lower. If you cut your fabric too thin, then you are going to have a weak fabric! You are also going to have a fabric that’s not very fun to grip and you probably won’t want to climb it anyway. You should check (with the manufacturer) to see what the breaking strength of your fabric is and then see if they know the breaking strength of the thinner fabric.


If fabrics are made with stronger edges, then cutting would obviously weaken the integrity of the fabric and those shouldn’t be cut. I’ve never heard of such a fabric for aerial work, but that doesn’t mean it doesn’t exist! I don’t sell aerial fabric, which is why the bottom line of this article is to say that you really need to be asking your manufacturer, not me. But I like to weight in …. just cuz.


As for how thin to cut it: Typically, stretchy fabrics come thin enough – I wouldn’t cut those. But non-stretch fabrics are generally pretty wide (which is great for sling, etc, but not for gripping the whole fabric all the time). I cut mine down to around 98’’ and it still feels a little thick for gripping. I am scared to cut it too thin as I have a few friends who have done this to regret it. At the same time, I do want the width for cocooning and when i use the fabric as a sling.


I would guess 80 inches is on the cusp of as thin as you want to go with non-stretch. I didn’t trust my cutting hand (plus curling fabric) with enough accuracy to get anywhere close to 80 inches. I think 90 is a better width to aim for. Anyone else out there have opinions on what width to cut the fabric to? Please comment below!