How to Be Judgmental When You Enter a New Studio

Sometimes, it’s a good thing to be judgmental. Particularly when your well-being (and maybe your very life!) depends on it. The goal of this blog is to give you practical tools so that when you walk into a studio, you can make a call for yourself: Is it safe to do aerial here? Unfortunately, sometimes the answer will be NO! It pains me to say it –because I want to believe the best from every human being and every studio–but some people have starting teaching aerial before their safety wisdom has ripened. Stay away from them bad apples.

First — Look Up & Ask Questions

Whatever the rigging is attached to should be able to handle the load capacity for EVERY point that is in operation that day doing aerial things. Here’s a great video to show how a drop can generate 900 pounds in a split second!

How safe are you going to feel on a system that is designed to hold 1,000 pounds? Um, let me answer that for you: back away slowly. OSHA recommends a safety ratio of 10:1, meaning that ideally, the system should be able to handle 9,000 pounds if you are going to be putting 900 pounds on your system. Now, generally, 5,000 pounds is acceptable in the aerial world for each rig point, but hey, higher is always better and safer!!!

Look at what you are hanging from. If you are unsure about anything, ASK QUESTIONS! Don’t be afraid to ask questions. If the owner is insulted, this is a red-flag! Any studio owner who has put years of research into best practices and thousands of dollars into safety is proud to talk your ear off about why their system is super safe, and how the engineers backed up their load capacity numbers well over 5,000 pounds. They didn’t just take some shady chain and loop it around the nearest trussing. (In general, aerial riggers recommend staying far away from chain. It is unpredictable in load capacity around beams and not suitable for most aerial rigging.)

Look at the Attachments

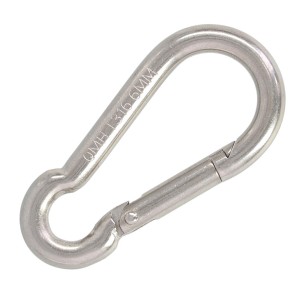
The big beam holding all your weight should look and feel sturdy. Next, we want to draw your attention to all the attachment points. If carabineers are being used, are they closed and locked? Are carabineers turned sideways or tri-loaded? Here’s an example of a carabineers that should NOT be used EVER for aerial work:

carabineer

I have seen cases of the above being used for aerial hanging. I would use this carabineer to hang my keys in my purse, not to hang my life. It’s a fine carabineer for other uses, but NOT rated for aerial. It’s working load limit is a dinky 180 pounds.

While many aerial riggers have a preference for steel carabineers, this is not law, and aluminum is okay, as long as it’s one that is rated for a minimum of 2,000 pounds (again, higher = better). Some red flags to look for no matter what carabineer is up there is side-loading. Side-loading a carabineer is a big no-no. A carabineer has different ratings based on how it is loaded and the best (not to mention safest!) is to always double check your rigging to ensure that carabineers are in their normal vertical positions.

Another no-no when it comes to carabineers is leaving them unlocked or unscrewed. This is a no brainer, but I see it happen a lot with new/less experienced riggers! No leaves it open on purpose, everyone can be forgetful. That’s why I teach my teachers that they have to go “clickity-click-click-it” every time in an annoying — but helpful for memory — way.  Having a routine that requires you to double check everything helps to avoid simple mistakes.

Screw-gate carabineers should “screw-down so you don’t screw up!” This helps for long-term safety as gravity can unravel a carabineer.

Another no-no for carabineers is tri-loading. I see it all the time, but it’s not how a carabineer is supposed to be used. It shouldn’t be done! Here is a great video from Vertical Art Dance (highly recommend their equipment and rigging services) that discuss this topic and more:

Thank you Vertical Art Dance for spreading aerial knowledge!

Tragically, this past year, Sam Panda was in a rigging accident and broke her neck from 13 feet up. I post the following video only to encourage everyone to seriously consider the consequences of faulty rigging. Thankfully, Sam Panda was generously supported and funded by the aerial community to support life-transforming surgeries and she is recovering just fine!

Warning: The following video displays the fall and may be hard to watch.

Look at the Equipment

Recently,  I visited a studio where the fabric had a ton of holes in it.  It was a high-volume, high-use studio, so it was a natural part of the game. Thankfully, it was run by teachers who knew how to conduct proper inspections of equipment. For small holes, the holes were sown up, sealed, and marked with permanent black marker. If the holes got too big or grew, then the fabric was retired. Everything was kept track of, which is an important part of running a large operation. I’ve heard all the stories including wooden bars of a trapeze breaking when someone landed with a little extra force (wooden bars are no longer used for general aerial classes), lyra breaking, rigging splitting and coming down, ropes untying, and more. You name it, I’ve probably seen or heard of it happening. Better safe than sorry. Old equipment should be retired. New equipment should be bought from trusted vendors.

Look at the Mats

First of all, make sure that mats are present!!! While mats cannot guarantee protection, they are sure going to help. When it comes to mats, aerialists prefer ones that are at least 8 inches in thickness. As always, the more, the merrier. The thicker, the better. The wider, the safer. Some mats are pretty dinky, making a small target to hope that your head lands on when you are swinging around 10 feet up. Look for generous sizes and that they are used WHENEVER possible. There is no reason to leave the safety of mats when learning new moves. Some cases are exempted when the performer becomes advanced and wishes to incorporate ground choreography and the mat gets in the way. But, this is an exception. The rule should be that in all general aerial classes, especially those were the participants are learning new moves and their feet are leaving the ground, there should be mats. And not just some thin, dinky thing that does nothing. A good, sturdy, solid mat. It’s a display of caring about the students and the studio.

Look at the Teaching Methods

The big things we are looking for here is warm-ups and proper progressions. Just holding some stretches is not a warm-up. You must do something that builds heat in the body and then you must get mobility in the joints through any variety of methods. More on great warm-ups can be found on a previous blog here.

When we look at the curriculum, what we are looking for is how assessments are made, and how moves are ordered. If day 1 for a new fabric class is cross-back straddle, this is a problem. This may have been the first move 10 years ago, but there has been a ton of progress in aerial education since then! It is now understood that cross-back straddle can be a very difficult move for many beginners and that proper care must be taken to build up the strength required for its proper execution. It goes hand-in-hand with straddle inversion strength which should be assessed for before a student works at this level. (There are always exceptions. You may have a strong gymnast who can handle a cross-back straddle in a private lesson on their first day on fabric. However, even in this case, we would assume that strength was assessed and that they are skipping levels only because strength was assessed and they passed. We are addressing the general rule of thumb for classes to the general population.)

Many aerial teachers of today are aerialists who learned fast and learned many advanced moves early in their training. When they go to teach beginners to today, they often are at fault for teaching the same moves that they learned first. Many students are not ready to go that far that fast. The more that aerial grows, the more we must grow our depth of beginning programs and beginning material because we are attracted more and more people from non-gymnastics backgrounds who may take quite the journey to find their inversion strength. We must offer them the proper strength-training regime so that they are building strength safely and slowly.

If a studio lets you learn drops on day two, this is a huge red-flag!!! Drops are the candy of aerial, and some studios think that by letting people learn them, they will be a booming aerial business. I’m sure they will, but they will also have a booming business with the nearby rehabilitation center. Drops and other high-level candy of aerial must be earned through proper progressions and body awareness growth. If you go a studio and think “This is too easy and low to the ground,” you’ve probably found a SAFE studio. Don’t worry — you’ll eventually be flying. No one is out to keep your wings clipped. Safe instructors are there to prevent you from jumping out of the nest before you have strong wings period.

Trust goes both ways. A students must trust the studio and the studio must trust the student. A studio can only trust the student by giving them one small task at a time to see how they handle it. If you are flailing at 2 feet off the ground they shouldn’t trust you to go 10 feet up. You shouldn’t get to fly 10 feet up without demonstrating you are trustworthy first. You may feel like your being babied at the beginning, but as long as you see other students who are flying high at the studio, stay with them. Once you pass the assessments and show you have the proper strength and control, you will benefit from their progression training. You will soon find yourself SOARING HIGH with wings that have been molded and chiseled in a way that only diligent training time can give you.

Some things to look for: When you train too hard too fast, your elbows will start hurting you. This means that you are putting too much weight on bent arms without first building up the strength in increments. A good instructor will have the answer to this right away. If not, e-mail me and I’ll send you my program to help prevent this and heal in the next couple weeks!!!

For parents, it is important to note that your child should not be practicing footlocks without first being assessed for proper ankle strength. When a child does too many footlocks without having firmly established ankle strength, they are at risk for deforming their growing bone structures. We have seen studios break out with an epidemic of foot problems due to having young students (under 12) on footlocks, and allowing them to sickle, not watching for strength or body awareness. Anyone can teach a footlock and a basic leg roll-up. Few people know exactly when and how to properly teach it.

As you can hopefully tell, I’m extremely passionate about proper teaching methods. That’s why I started the Born to Fly Teacher Trainings & Support Systems for teachers. While I do not believe that every teacher should be trained under our system, it can be a powerful tool out there to help raise the standard for aerial education. When looking for an aerial teacher, you can check on their certification at the following link: http://www.borntoflyaerial.com/certificate-holders.html

We have had people falsely claim to be Born to Fly Certified when they were not. It is always good to check on certifications. No one who is certified will mind. Quite the contrary. The will be overjoyed that you value their hard-earned certificate!

One last important note:

Our studio directory on this website does not endorse the listed studios, nor can it vouch for the safety or training methods at the various studios. Please become as educated as you can and start asking all the right questions as you enter a studio, listed in our directory or elsewhere. Be safe and happy flying!



Trapeze Contributions by Guest Artist McKinley Vitale

Hey all! Quick General Announcement before we get to the trapeze stuff:::

AerialDancing.com will remain at this url for now, but please notice that we have updated our logo. We are now Born to Fly Curriculum. You may see this change reflected on our Instagram page and Facebook page as well. Thanks!

McKinley’s Recent Visit

This past month (December 2017), McKinley Vitale made the trek out from Atlanta to visit me in Castle Rock, Colorado. McKinley had a good time performing in our local show (which was broadcast live on facebook), and fun working with our local students, but the work that you might be interested in is our filming of trapeze moves for the Born to Fly Curriculum!

Melissa Roberts, of Canopy Studio, did a fantastic job lying the foundation for me for trapeze curriculum in 2016.  Since then, I have moved to Colorado and opened a studio, giving me a chance to beta-test the trapeze curriculum on beginning students. I have to admit trapeze is still a hard-sell at the studio. There aren’t enough beginner moves that “don’t hurt” and sling has definitely been the winner for beginning classes. Those who are wanting to try trapeze at the studio are a little more advanced and I found myself in a position in hunger for more trapeze.

Enter McKinley. She picked up where Melissa left off with intermediate trapeze and away we flew! We documented–through videos and photography–moves such as hip circles, teddy bear transitions to ankles, etc, around the world variations and much much more.

Some Puzzles We Worked On

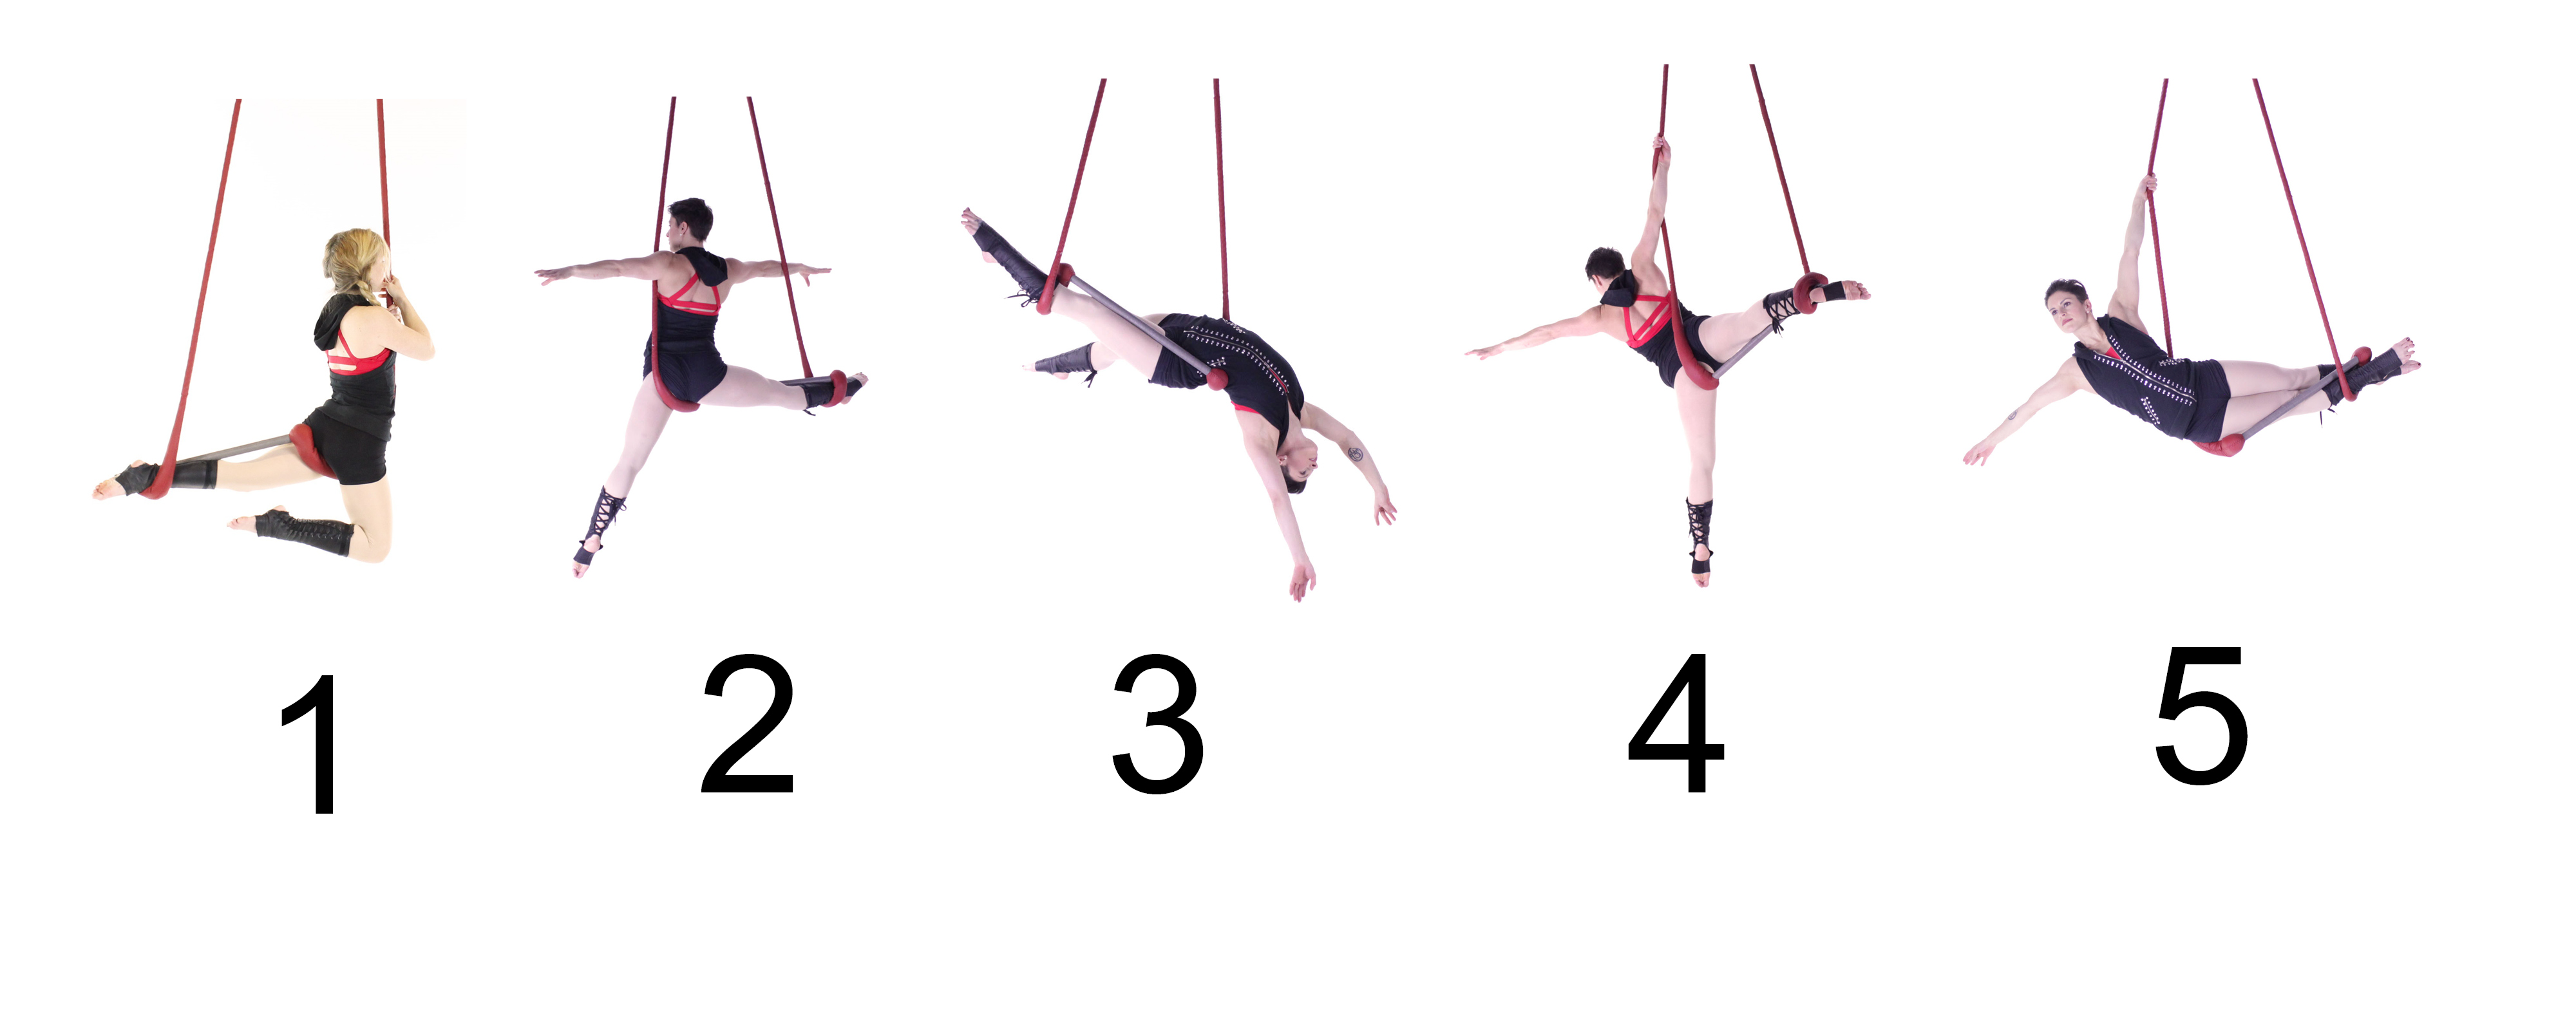
One of the highlights that stood out was playing with all the variety of leg rolls that you can do on trapeze. See if you can identify the following rolls:


trapeze moves

(1) is the basic leg roll. To enter this roll, the free leg must be threaded around the rope the moment before you roll up into the trapeze. (2) is the reverse

(3) is the Leanna roll and (4) is the reverse Leanna roll. It might be a little hard to see the “reverse” in the ending pose, but the entry is clearly reversed. Again, the reverse part of the name is coming from switching the base leg, not because you are switching direction. The last roll pictured (5) is the Mermaid roll, which is a roll where both legs are in the Leanna roll and you end in a mermaid position of the body.

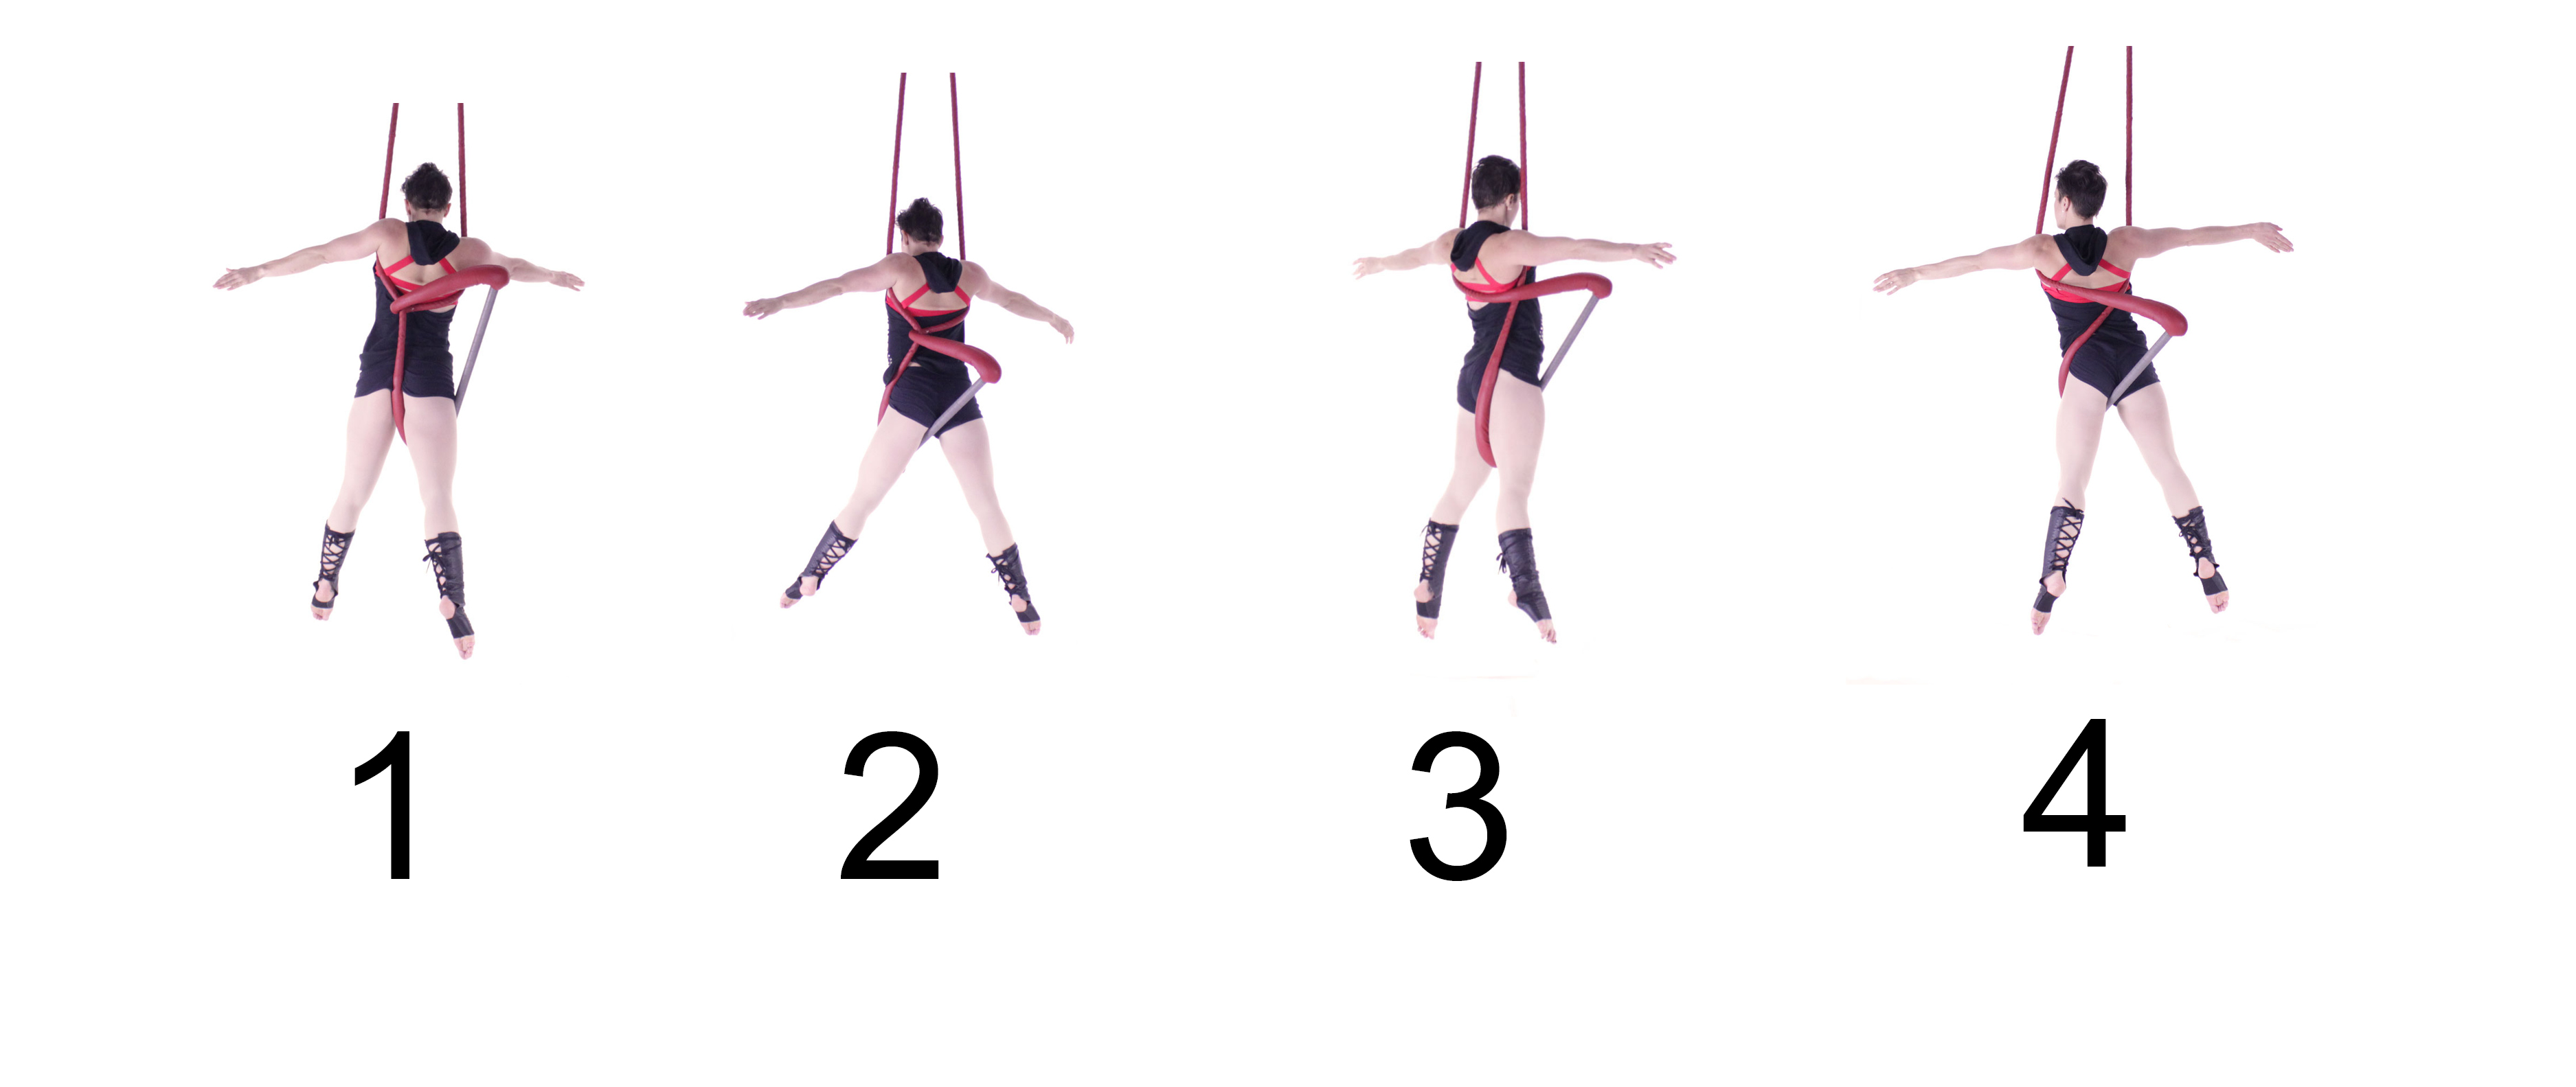
The next puzzle that I am having fun exploring is all the variations of surrender. Surrender is a classic Canopy pose that has a moving story which we covered in another blog. Here are 4 variations we discovered recently:

trapeze moves2

As you may be able to tell, some variations are more comfortable than others. I’ve been having fun trying to find new ways into all these positions. You can find one of my latest solutions on our Instagram page here:


Now I have the fun job of going through the 1,000’s of photos and sifting through hundreds of videos to edit all the right ones for you! Thankfully, I just hired on some help for this massive project, so hopefully, it won’t be too too long before these moves hit the video library. Eventually, this will all become a part of the trapeze manual, but there are some other manuals ahead in line, so it won’t be coming out just yet. In the meantime, hopefully you get inspired to play on trapeze like I have and send me what you discover! I’m always looking for new trapeze ideas and curriculum, so if you want to share, feel free to do so!!!

What’s in a Warm-Up?

As a teacher, it’s really easy to get warm-up burnout.  As a student, sometimes it can be easy to think rolling on the floor stretching is a warm-up. Both sides can use more of the WHY involved behind the motions. If you know WHY you are warming up and what your GOALS are, they will be easier to meet. And hopefully this blog can help you find new, fun ways to meet those goals.

Bring on the HEAT

The first step of a warm-up is that it should elevate the body temperature to that next degree. If you are wearing a sweater when you start warm-up, you should want to take it off in the first 5-10 minutes of the warm-up. That means you need to BRING IT!

Cardio work is the easiest and sure-fire way to get everyone in class warm, but it doesn’t always have to be cardio. You can use yoga or Pilates, or something along that vain as well AS LONG AS IT IS GETTING THE CHEEKS PINK. When people are worn out from cardio, I hear the breathing get heavier, so I know that they are working, but with non-aerobic work, you won’t necessarily hear the breath change. Instead, you can look at the cheeks around you (on the face silly!) and look for the flush that comes when you are working hard. In yoga or other non-aerobic exercises, it may take more TIME to arrive in the warm-up state. For example, in a ballet class, you may prepare the legs for about 30-45 minutes before you demand them to jump and leap. Be prepared to allow all the time necessary for your warm-up to take people from cold->ready.

DO IT WITH PURPOSE

While you are doing this, use the time to teach other principles of the body. For example, while ballerinas are getting their legs and feet warmed up, they are not thinking “This is warm-up, and I can check out until the jumping happens.” No! Those very first plies and tendus of the workout teach alignment. Going slow helps prepare for setting up body pathways and habits so that when the heat is on, those degages can happen fast and fierce.

For aerial, that might look like a mock pull-up. It’s a little hard to do this progressively with with just pulling down on air, but just going through the motion is valuable as it sets up the body for knowing where it is supposed to be in space.

THE WHY

Why are we so interested that the body temperature goes up? Well, have you ever tried to stretch a cold muscle? If you have, then you intuitively know that it doesn’t feel like it’s going anywhere, but after that heat comes, that muscle is much more prepared to lengthen. When we are cold, the blood is not circulating as much to our extremities and our bodies are more in conservation mode. (If you suffer from cold hands, you may want to really up your game in warm-up until you have warm hands so that you know the blood is in full circulation mode.)

When our blood is circulating more, it is carrying oxygen and nutrients to our muscles to help everything function better, or so I’ve read. I can attest to the feeling, that’s for sure! Warm muscles = happy, ready-to-work muscles.

Care for the Body Parts that will be in High Demand

For our aerial classes, the main thing that we need to prepare is the shoulders because we are sure to use them. There is no way to let them check out when you are in climbing mode. But, it’s also good to give attention to other parts of the body. If you have a specific target area for that workout, be sure to target that especially! Example: If you are going to be doing splits in your double footlocks, well, you need to warm up your splits, etc.

Nerve Care

Nerve Flossing has recently completely changed my universe. I used to suffer from chronically stretching my hamstrings and not getting anywhere. Then, I took a course from Cirque Physio. Apparently, my nerves were totally stuck, because when they got unstuck, my whole world changed. So, of course, I’m passing on the tricks of the trade to my students. In the following warm-up video, we are focusing on nerve flossing for the legs to help improve everyone’s pike position. Then, we focus on the ulnar nerve stretch to check in and see if anyone was tight there. All these exercises came from the courses by Cirque Physio, which I highly recommend. Check out the courses: Click here to visit Cirque Physio.

Peanut Rolling/Self-Massage

Before I was inspired by Cirque Physio to buy some peanuts, I lived on my foam roller. Both are incredible tools for getting muscles more ooey gooey and supple. When you first start rolling, the pressure might hurt, but soon, you’ll toughen up and get addicted!

For me, rolling replaces where I used to stretch. I still swing around my shoulders and dynamically stretch, and sometimes, especially on hot days, I may still add in brief stretches into the warm-up after the cardio portion, but in the colder months, getting on the rollers help to loosen up muscles and fascia in a way that stretching can’t.

In the video, you might see us rolling on our pec minor. This is an exercise that Cirque Physio highly recommends in order for the shoulder blade muscles in the back to function better. The pec minor tends to be tight and since it attaches to the scapula, it can sometimes get into a sibling fight with the muscles that attach to the other side of the scapula. Prevent the fight (and your bad rounded shoulder habits) by telling the pec minor to  back-off.

Rotator Cuff/Shoulder Engagement

The key thing here is that this is not an exhausting workout for your rotator cuff muscles (link is to a previous blog that includes a great video of what your rotator cuff muscles are). If they get worn out, they are not going to able to properly stabilize your shoulders and you actually put yourself MORE at risk for shoulder injury instead of less. But, with just the right amount of activation and engagement, you invite these suckers to fire on and help protect your shoulders. There are a large variety of exercises you can do here, and I will be covering some of my favorites in an upcoming blog. In this video, I have my students do: external rotation with the resistance bands, horizontal shoulder abduction, and then a lovely stretch sequence which helps to open up the shoulders

Everything in Moderation

With every aspect in warm-up, there’s a line where it’s too much. Too much cardio and you won’t have any energy left for a workout. Too much nerve flossing and your limbs will go numb. Too much muscle engagement and you’ll be fatigued even before the workout starts!

However, it’s really important to note that beginner students WILL get pretty worn down by warm-ups at first. They are highly likely to think they are too long. They might think they are doing things that aren’t really necessary (can’t I just climb that fabric now?), but stick with it! In the long run, they will learn something called appreciation. They will see (and notice!) the difference. Time and time again, I’ve watched people CHANGE their minds about warm-up. I known I have a warm-up convert when my students come in before a class or private lesson, etc, and they know exactly what to do to warm-up. They are over on the sideline doing Pilates hundreds, working their butt off like mad. And what completely wipes out a beginner doesn’t even phase them anymore because it’s been in every warm-up for the past 6 months.

There’s No Such Thing as “One Size Fits All” For Warm-Ups

Although aerial teachers do their best to find a “one size fits all” for warm-ups, I always tell my students that there is no perfect warm-up that I can give them. However, I am there to help them discover the perfect warm-up for their own body. I believe in perfect warm-ups for individual bodies, and my hope is that students will come early to class and continue side-line warm-up throughout class until they feel like they are in their peak condition for that day for that class. Yes, I have high expectations. It’s what makes me a good coach. 🙂

And while not every student comes early to class, I do see students going rogue in my warm-ups which makes me really HAPPY because they are learning that they need to take responsibility for their own bodies and listen to the needs of their bodies. I always tell the story of how I got injured and therefore, I need XYZ to make my shoulder move. If I relied on a “generic” warm-up, I wouldn’t have the best workouts because my shoulder needs more care to prevent stiffness (which I’ll get so bad I can’t sleep if I don’t warm up or cool down properly)! So, I have to independently add in stuff before or during class so ensure my own self-care. Everyone will have their thing — certain tight spots, etc, that needs extra attention and it’s important that individual needs are addressed. There’s NEVER enough time to do it all or do it perfectly, but the best thing we can do is educate. The rest is up the students to step up and take responsibility!

This video shows an example of a 30 minute warm-up which is included in a 90 minute class. Enjoy!